
Apollo 4SG-600: How To Repair

I have a 4″ Apollo 4SG-600 model on a fire system that needs some work. Before getting started, I wanted to ask if you had any information or tips on what to expect when I open this assembly.
Mark:
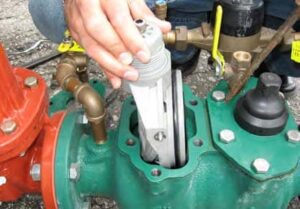
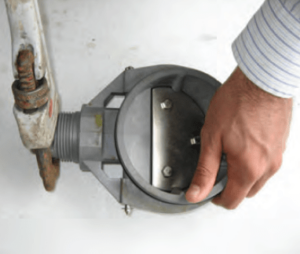
The access cover for the Apollo Conbraco 4S/4SG series is secured by bolts and sealed by a gasket. There is no spring load on the cover. Before removing the bolts, it is important to remove the black plastic spring cap that is located on top of each of the check valve covers. The spring caps are there to simply protect the check spring assembly that protrudes through the check cover. Note: The check valve cover cannot be removed without first taking off the spring cap. These are removed by un-screwing counterclockwise. The spring caps should be hand tight, but depending on the age of the assembly you might need to use a wrench to loosen. Once the spring caps are removed, do not disassemble the spring assembly any further. You can now remove the cover, bolts and gasket.

Doug:
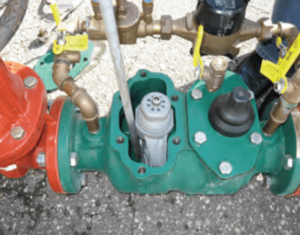
The check valve modules for the Apollo 4SG-600 are secured by the check cover and sealed by an o-ring. Once the cover is removed, push the top portion (spring assembly) of the check valve towards the downstream side of the device. Depending on the age of the device, you may need to use a standard screwdriver to pry the check valve loose and then lift the check valve out of the device body.
Mark:
The next step is to release the spring tension that is on the swing arm. To do this, we need to remove the spring assembly from the check module. Note: Do not remove the socket bolt at the top of the spring assembly. This retainer bolt holds the spring in the compressed position. The spring module is threaded into the top of the check assembly and is removed by turning counterclockwise. You may need to use a wrench on the flats near the top of the spring module to aid in its removal. After removing the spring module, the disc holder is able to swing open without any tension.
Doug:
To replace the rubbers simply remove the retainer bolts and retainer plate to allow access to the disc. After replacing the rubbers and cleaning the check seat, we can now reassemble the spring assembly back onto the check valve module. You should be able to hand tighten the spring module back into place without the use of a wrench. When reinstalling the checks, place the bottom of the check valve into the bore of the body and push towards the inlet side of the device. Once the bottom side of the check is in place, you can now push the topside of the check valve into place. When replacing the cover gasket, be aware that the gasket could cover the test cock opening. After bolting the cover back into place, lube the o-ring on the plastic spring cap and secure (hand tight) to the access cover.

Click below to watch our step-by-step repair video for this unit:
