
Flomatic RPZ: How To Repair

I am servicing a 1 1/2″ Flomatic RPZ (reduced pressure assembly). This is the first time that I have had to go inside this assembly. I was wondering if you guys could tell me a little more about this manufacturer and this model so I will be pre-pared.
Doug:
Although Danfoss Flomatic has been building check valves for many years, they joined the backflow industry in the 1990’s. They introduced their first backflow prevention assemblies in 1993, which included models of Double Checks Valves, Reduced Pressure Principle Assemblies, and Pressure Vacuum Breakers. The 1 1/2″ Flomatic RPZ you have could be one of four models. It could be labeled a RPZ, RPZE, RPZ-II, or RPZE-II. The RPZ and RPZE are the original models and are identical in outward appearance, the only difference being that the RPZE body is made of a lead free bronze. The RPZ-II and the RPZE-II (lead free) have a shorter lay length. Internally, they utilize a smaller check valve seat and a smaller relief valve stem assembly. The process to repair any of the 1 1/2″ Flomatic units is the same.
Mark:
This Flomatic RPZ has a single access cover and it is sealed by the RV diaphragm. To get inside this unit, simply remove the six 9/16″ cover bolts. The cover is spring loaded so make sure to hold it firmly while removing the cover bolts. Once the cover is removed the relief valve stem assembly and RV spring will be free. Once you have removed the relief valve stem, you can visually check the relief valve seat for any dam-age. The RV seat is O-ring sealed and is pushed into the body. To remove the seat, just pull straight up and out of the body. Now we will move onto repairing the check valve modules.

Doug:
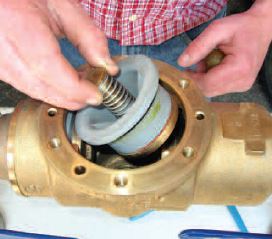
The check valve modules are sealed by an O-ring. Each check valve module is held in place with a spring clip that resembles a wire with tabs. To remove the spring clips, simply pinch the tabs together and pull the clips up and out. You may have to use a pair of pliers to pinch the tabs together on this size device. Once the spring clips are out, the modules can be removed by pulling them straight out of the body. A flathead screwdriver can be used to pry them out.

Now that the check modules are free, we can replace the rubbers and examine the seat surface. As you will see the check modules are spring loaded and the spring tension must be released in order to service the check disc. Use a wrench to hold onto the stem and another wrench on the disc holder. Unscrew the stem from the disc holder. Be sure to hold the check firmly until the spring tension is released. Once the stem and spring are free, the module comes apart very easily.
You will want to check the plastic check seat for wear or damage. If there is damage to the check seat then you will need to replace the entire module. After replacing the check rubbers and the check O-ring, reassemble the modules in reverse order. Make sure to lubricate the check O-rings and push the checks modules back into the body. When replacing the spring clips situate them so the tabs sit in-between the notches at the top in the brass body. If you have trouble get-ting the spring clip back in, make sure that the check is seat-ed completely in the body.
Mark:
Now we can service the relief valve stem. The diaphragm is located on the upper stem. Place a wrench on the top stem and hold the relief valve piston with the other hand and unscrew the piston to free the diaphragm. The relief valve disc is located on the bottom of the stem. The relief valve disc is free once you unscrew the stem from the disc retainer.

Reassemble the relief valve in reverse order. Be sure to replace and lubricate the plunger O-ring located at the top of the stem. Before you place the RV stem into the body, place the RV spring in the body so that it is centered over the relief valve seat. When putting the relief valve stem back, make sure the holes in the diaphragm for the bolts and tests cocks are lined up with the holes in the cover and body.

Doug:
It is easiest to mount the top of the stem in the cover to align the holes. You may want to put the cover bolts in to help keep the diaphragm aligned. Now the stem and cover can be placed into the body as one piece.
