
Hersey 6CM: How To Repair

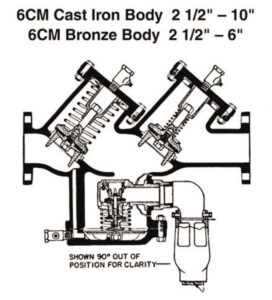
I am working on a 6″ Hersey 6CM reduced pressure principle assembly. The first check valve failed and I am preparing to make repairs. I am not familiar with this model. Can you give me some suggestions or tips before I get started?
Mark:
Before we get started, you need to be aware that production for the Hersey 6CM and its hardware components ended in 2004. The rubber repair parts are still readily available. Hardware components like seats, springs, guides, etc. may not be available any longer.
To some people, the Hersey 6CM can be intimidating at first sight. Yes, it may look a little different but it works the same as any other reduced pressure assembly. You should prepare as you would for any other assembly. Be sure to have the correct rubber parts repair kit on hand, as well as, a helper. The internal parts for the 6CM can be a little cumbersome because of their size and weight. One person could repair this unit by himself, but it is much easier with two.
Doug:
The check valve springs are contained when the lids are removed. Once the check valve lid is removed, you will notice what looks like a solid brass plate with a recess in the middle. This solid brass plate is the spring retainer. In the recess there will be a nut that looks as if it should be removed. DO NOT remove this nut. This nut secures the spring retainer and spring. On either side of the recess on the spring retainer there will be two 3/8” tapped holes. These holes are for eyebolts which you will need to install. A piece of pipe can be put through the eyebolts to make a handle to use for pulling the check valve straight out of the body.
Mark:
Now that the check valve is out of the body, you can proceed with your repair. The check disc can be changed easily by removing the guide. The check valve guide on the model 6CM also acts as the check disc retainer. The guide is easy to identify by its four guide “arms” or “prongs”. The guide arms actually ride on the inside of the check valve seat. Be sure to inspect the guides for any damage or uneven wear.
Doug:
Before replacing the check valve back into the body, be sure to inspect the seat carefully. There are two parts of the seat to look at on this model. Obviously you will check the seating surface for nicks or damage, but also inspect the inside surface of the seat for any wear or grooves that can be caused by movement of the CV guides. Minor wear can sometimes be polished out with light sand cloth, but if the grooves are deep, then prepare to replace the seat. The seat requires a special tool for removal and installation.

One more word of caution! Be extra careful when sliding the check valve back into the body, because one slip could permanently damage the seat and/or check valve guides. Please remember to check with your parts supplier for the availability of the seats or any other hardware parts for this assembly.